Sprayed vs Brushed Cabinet Finishing: What the Surface Shows
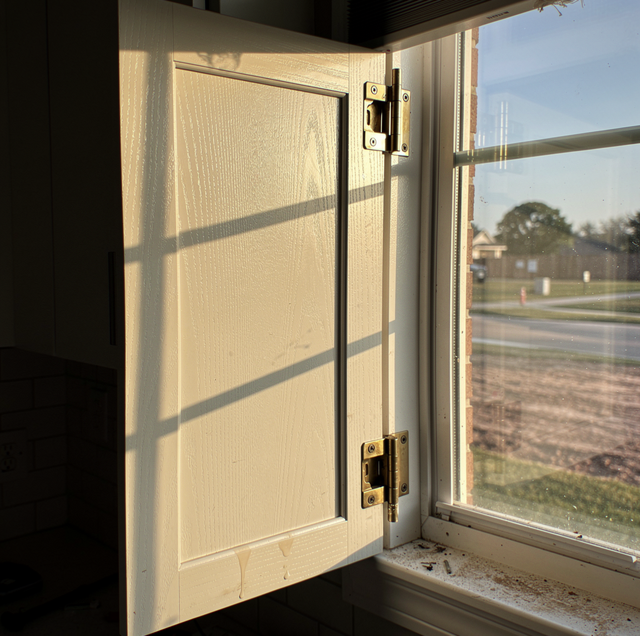
Raking light off a window is the test a cabinet finish fails first. It hits a cabinet door at a shallow angle and turns every irregularity into a shadow: a brush ridge, a proud edge where two coats overlapped, the faint orange-peel texture of a spray pass laid on too thick. Flat overhead light is far more forgiving; it washes over the same door and hides most of that texture, which is why a finish that looked flawless in a showroom can read differently once it is hanging under a kitchen window in the late afternoon.
That gap between the two kinds of light is what the choice between spraying and brushing is really about. The method a door gets does not just change how quickly the work gets done. It changes what the surface looks like when the light hits it, and it changes what happens the day someone dings a corner.
A Sprayed Coat and a Brushed Coat Leave Different Surfaces
A spray gun breaks the finish into a fine mist and lays it down in thin, even passes that flow together into one continuous film. When done well, the surface reads as a single plane, with no brush direction and no texture the eye can discern under raking light.
Sprayed film: The coats go on thin and self-leveling, built up in several light passes overlapped enough to avoid stripes without letting runs form on a vertical door face.
A brush or roller lays the finish on heavier and by hand, and the film has to level itself after the tool leaves it. Some finishes flow out and erase most of the stroke marks; others hold a faint texture no matter how careful the hand.
Brushed film: Each coat lands thicker, with a slight ridge along the stroke direction and a subtle build wherever two passes met, both of which raking light finds even after a full cure.
Neither surface is the wrong choice on its own. A brushed finish on a flat-panel hallway door under only overhead light reads as clean as a sprayed one. The same brushwork on a raised-panel door under a west-facing window is a different story, since the profile has more edges for a stroke mark to catch and more raking light hitting them.
What the Surface Has to Be Before Either Method Works
Neither method fixes a surface that isn't ready for it.
An existing factory finish: The old coating has to be scuffed enough to give a new coat something to grip, and any spot where it is chipping or lifting gets addressed first, because both methods follow the shape of whatever is underneath rather than hide it.
Bare or newly built wood: The grain gets filled or sealed to the degree the finish style calls for. Open-grain wood left unsealed telegraphs its pores through either topcoat, usually more visibly under a sprayed finish because that film is thinner and truer to what's under it.
Grease is its own category. A range hood cabinet or the doors flanking a cooktop pick up an airborne film ordinary cleaning misses, and neither method bonds a topcoat over it. That surface gets degreased as a separate step, not folded into the general sanding.
Dust, Temperature and Where the Coat Cures
A shop build: the room has forced-air ventilation, filtered exhaust, and nothing else throwing dust into a wet film while it cures. A door goes in, gets its full coat schedule in a controlled space, and comes out finished before it's ever near a house.
A kitchen still in use: none of those conditions hold. Dust from the rest of the remodel, foot traffic, temperature swings between a hot afternoon and an air-conditioned evening, and a family that still needs the room all work against a wet film curing evenly.
A builder who makes every cabinet from scratch has an advantage a refinisher working only on site lacks: every door and drawer front can be sprayed in a shop before it ever reaches the house, on a schedule that keeps the room's dust and traffic away. That is not available to someone refinishing what is already installed.
The Coating Chemistries Each Method Can Carry
Waterborne and alkyd enamels: A brush or roller can apply these, because they're formulated to level themselves after the tool leaves the surface, which is part of why they're the default for boxes finished in place.
Conversion, catalyzed, and two-component finishes: A spray gun is the only practical way to apply these. Conversion varnish, catalyzed lacquer, and two-component polyurethane cure through a chemical reaction rather than simple evaporation, and their working time is short enough that hand-applying them produces lap marks and uneven build before the material sets up. These give shop-built doors their hard, chemical- and scratch-resistant surface. Sherwin-Williams catalogs both ends of that range, brushable trim enamels for on-site box work and sprayable conversion finishes for shop doors. Choosing a chemistry the application method cannot carry well is how a finish ends up thick, tacky at the edges, or slow to fully harden long after it feels dry.
Curing and Handling Before the Doors Go Back On
A sprayed coat's thinner, multiple-pass build generally moves through its early handling stage faster than a heavier brushed coat, but "faster" is relative: both need to fully harden, not just feel dry, before hinges go back on and a door starts closing against its neighbor every day.
Two fully cured stiles, standing side by side in the low afternoon sun, sort themselves out from across the room. On the sprayed stile, the window's reflected edge forms one unbroken line from rail to rail. On the brushed stile, that same line wavers where two strokes met, a faint bright-then-dim ripple running with the grain, still there after a light scuff-sand between coats. It isn't rough, and it isn't a defect. It just isn't flat the way the sprayed one is.
Atomized finish suspended in an enclosed space makes the air itself flammable, and a pilot light or a thrown switch can find it. Spray finishing belongs in a booth with supplied-air respiration, never a closed garage.
Doors handled too soon show it later: a fingerprint in a still-soft film, a sticky spot where doors touched before fully setting, a difference in sheen where one cured flat and another leaned against a wall.
What Happens When the Finish Gets Damaged Later
This is worth saying honestly: a sprayed finish is harder to fix than a brushed one, and that is a real trade-off for the better-looking surface. A brushed or rolled cabinet can be touched up in place with the same can and a small brush; the repair won't be invisible under raking light up close, but it blends well at normal viewing distance and doesn't require the door to leave the house.
A sprayed door doesn't work that way. Its film is thin, cured hard, and built for a spray gun's fan pattern, not a brush stroke. A chip or scratch usually cannot be spot-repaired without leaving a visible patch, a texture mismatch, or a sheen halo around the repair. That's a real consequence of choosing the finish that looks better under a window: the fix is a shop trip and a rehang, not a can and a brush.
Four Jobs and Where Each One Lands
Laid against actual jobs rather than preferences, the choice resolves quickly:
| Your situation | Which method fits | Why |
|---|---|---|
| New doors and drawer fronts for a full kitchen build | Sprayed, in a shop | Every door can travel to a controlled space before installation; there is no occupied room or dust cycle to work around. |
| Existing cabinet boxes refinished with the kitchen still in use | Doors pulled and sprayed elsewhere; boxes brushed or rolled in place | A box interior can't be tented and ventilated like a booth, and the room still has to function during the work. |
| One damaged door on an otherwise finished kitchen | A brushed touch-up if the damage is a surface scratch; a full re-spray at the shop if it reaches the wood or MDF underneath | Matches the repair to how deep the damage actually goes, not to which method is more convenient. |
| A color change across a whole kitchen | Doors removed and sprayed, boxes finished in place | Keeps the most visible, most-touched surfaces uniform without pulling every box out of the house for weeks. |
Frequently Asked Questions
MDF's cut edge, especially on a routed panel profile, is far more absorbent than its face and drinks finish unevenly. Those edges usually need an extra sealer pass before either topcoat goes on, or they show as a dull halo around the profile once the sheen builds.
Those cured coatings are hard and slick by design, so a brushed touch-up over one usually needs a dedicated bonding primer first. Ordinary enamel painted straight over a cured conversion varnish or catalyzed lacquer peels off in sheets at the first door edge that takes a knock.
Oil-modified varnish, conversion varnish, and lacquer residue on rags or spent spray filters can generate enough heat to ignite on its own if balled up in a trash can. They need to be laid flat outdoors to dry, or sealed in a metal container, before disposal.
The safest way is to record the exact product name, sheen level, and any custom tint formula number from the original job. Eyeballing a match against a faded original rarely lands exactly, even from the same brand.
Satin and semi-gloss finishes from two different production runs, even at the same nominal sheen, can read slightly differently side by side. A partial repaint is usually planned by a whole visual zone, an island or all the uppers, rather than door by door, to avoid a visible seam.
A higher-gloss sheen reflects light more directly and shows a brush ridge or spray pass line more readily than a low-sheen finish does. That's why a high-gloss finish is the least forgiving of a brush and a low-sheen finish the most forgiving, before anything else about the door is considered.
A cabinet finish is inspected constantly, every time a hand reaches for a handle in daylight or under a range hood light at night. The method behind it is not a finishing detail. It is the difference between a surface that holds up to that scrutiny and one that only looked right under even, flat light.
See the finish before you commit to it — request a cabinet finish sample sprayed and brushed side by side, so you know exactly what will be hanging in your kitchen once the light changes on it. Palacios Construction Group serves Willis, Conroe, and The Woodlands. Call (936) 828-8664.
