The Layers That Keep a Tile Shower From Leaking
The first sign usually shows up in the next room. A dark line along the base of the wall on the other side of the shower, or a strip of wood flooring a few feet from the bathroom door that has cupped and lifted at the seams. Back inside the shower, run a knuckle across the wall tile: most of it answers with a tight, solid click, and then two or three tiles return a hollow, papery note. The mortar behind those released some time ago, and something wet has been living back there long enough to do it.
Tile and grout were never the waterproofing. A tile shower is a stack of layers, and the one that actually holds water back is a continuous plane sitting behind and beneath everything you can see. Water getting past grout is not a failure; it is the expected condition, and the assembly is built to catch that water and route it back to the drain before it reaches framing. When a shower leaks into the next room, one of the layers underneath is missing, discontinuous, or was built out of order.
Here is that stack, from the studs outward.
What the Framing and Blocking Have to Get Right
Everything above depends on a flat, stiff, plumb surface to build against. Studs come out of a bundle with crown and twist in them, and a wall framed without sighting and correcting those gives a plane that wanders across a run. Tile telegraphs that as lippage at the edges, uneven joints, and stress on the high spots where the tile bridges instead of bedding.
Stiffness matters as much as flatness. Tile and the mortar under it are brittle in a way the framing is not: they carry compression well and tolerate almost no flex, so an assembly that moves under load works the bond loose over time. That is what puts the hollow note under a knuckle years later. It is also why a good build adds solid blocking where the wall will be cut or loaded: behind a niche opening, behind the framing that carries a bench, and at glass hinge locations. Blocking for grab bars follows its own placement rules. Membranes are flexible, but they are only ever as stable as what they are bonded to.
The Shower Floor: Pre-Slope, Mud Bed, or Bonded Foam Pan
There are two honest ways to build a shower floor, and the difference is where the water plane sits.
The traditional mud bed: A sloped layer of deck mud is packed over the subfloor first, falling toward the drain at the standard quarter-inch per foot. That is the pre-slope. A flexible pan liner goes over it and up the walls, then a second mortar bed is applied over the liner and tiled. Two drainage planes, one at the liner and one at the tile.
The bonded pan: A pre-sloped foam or lightweight pan is bonded to the subfloor with thinset, then waterproofed at its top surface. One drainage plane, right under the tile.
Both work. The failure that ruins the traditional version is skipping the pre-slope. If the liner is laid flat on the subfloor and the slope is built only in the mortar above it, every drop that soaks through the top bed reaches the liner and sits there with no fall to carry it to the drain. It stays saturated and wicks, and the tile can look perfect for years while the pan below never dries out.
A curbless entry achieves the same result by recessing the floor structure instead, so the slope starts below the room level.
The Waterproofing Plane Itself
This is the layer that does the work. Two families are in common use, and the rule is to commit to one and keep it continuous.
Liquid-applied membranes are rolled or troweled on in multiple coats, with reinforcing fabric worked into changes of plane, seams, and corners. RedGard is one of the common ones, and it provides a useful visual check: it goes from pink to red as a coat dries enough to recoat, so you can see whether a wall got its full build or just one thin pass.
Sheet membranes are bonded to the substrate with thinset, with overlapped and sealed seams and preformed inside and outside corners rather than folded field material.
The word that matters in both cases is continuous. Walls to floor. Floor to drain. Up the inside face of the curb, over the top, down the outside. Around every fastener driven through the plane. A shower is not waterproofed by covering the wet zone but by leaving no interruption in a single surface, which is why joints deserve more attention than fields.
The Substrate the Tile Actually Sticks To
The membrane and the tile both need something to bond to, and the two normal choices behave differently.
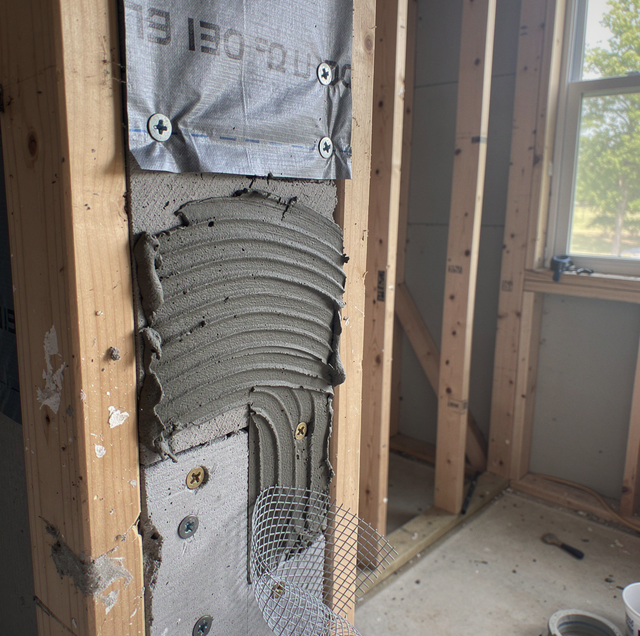
Cement backer board, such as HardieBacker, is a dense, dimensionally stable panel that is not damaged by water. It is not a water barrier; water passes through it. Its job is to give the membrane and the mortar a surface that will not move. It goes up with corrosion-resistant fasteners, the panels are gapped rather than butted tight, and the seams are filled with thinset and taped with alkali-resistant mesh so the joint moves as one piece.
Foam board is light, insulating, easy to cut, and has waterproofing integral to the panel. It moves the risk elsewhere: every screw and washer, every seam and every corner has to be sealed with the manufacturer's sealant, because no separate membrane is coming behind to cover a miss.
Neither is better in the abstract. What fails is a hybrid, half one system and half another, with nobody owning the transition.
The Drain: Weep Holes or a Bonded Flange
The drain is where the assembly terminates, and the most misunderstood piece.
A traditional clamping drain is two pieces. The pan liner is sandwiched between the lower body and an upper clamping ring, which is bolted down through it. Around the base of that body sit weep holes, whose purpose is to let water that reaches the liner get out. Without them, the lower mortar bed simply holds water. The mistake that kills them is burying them: mortar packed against the drain body plugs the weep holes on installation day. The prevention is pea gravel or a manufactured weep protector around the body so those openings stay clear under the mud bed.
A bonded flange drain works differently. Its wide, flat flange accepts the surface membrane directly, so the water plane and the drain form a single continuous surface. No second drainage plane means no weep holes to protect. A bonded linear or trench drain terminates the same way: along a line rather than at a point.
Thinset, Tile, and Grout Are the Wear Surface
Once the plane is sealed, the tile takes abuse, sheds most of the water, and looks right. Mortar coverage is what makes it durable. A tile set on four corner dabs has voids behind it that hold water, and nothing to lean on under a knock. The right method is a correctly sized notch combed in one direction, ridges collapsed by pressing and moving the tile, plus back-buttering on large-format pieces the notch alone will not fill.
During a wall set, ask for one tile to be pulled and flipped before the mortar skins over. Its back should show mortar across nearly the whole tile, not four corner dabs.
Grout is cementitious and porous. It fills and stabilizes the joint and resists abrasion; it is not a barrier. Sealers slow absorption and ease cleanup, but they do not turn a joint into waterproofing.
Where Assemblies Actually Fail: Curbs, Corners, Niches, and Benches
Fields of tile on flat walls almost never fail. Transitions do, because each one is where the plane has to turn a corner, wrap an edge, or accept a hole.
The curb: Wrapped on all three faces, inside, top, and outside. It is also where glass-track fasteners are driven straight through a finished membrane, creating a hole in the plane where water pools.
Changes of plane: Wall to wall, wall to floor, and the perimeter where tile meets a tub deck. These are movement joints. The two surfaces expand and contract at different rates, and a rigid grout joint cracks. Silicone belongs there, not grout.
The niche: A hole cut into a wet wall. It needs a framed head and sill, a sloped bottom so water runs out instead of standing on the shelf, and waterproofing carried into and around it, sealed where the returns meet the field.
The bench: The same problem with body weight on it. Sloped top, membrane carried fully over it and lapped into the wall plane, no unsealed junction at the wall.
A shower leaking into the framing can saturate studs, sill plate, and subfloor, and create hidden mold long before anything shows on the surface. Do not open the wall yourself; have the extent assessed first.
Here is the part that is not welcome news. If the grout at one corner is cracking and nothing else is happening, that joint wants silicone and you do not need a contractor for it. Once there is a dark line at the base of the wall in the next room, regrouting is not a repair. The water plane has already failed, and the assembly is removed and rebuilt. That is a bigger answer than the question most people call about, and it is the one worth hearing before another year passes and a cosmetic fix hides the damage.
A shower that lasts is decided in the layers nobody will ever see again. Once tile is on the wall, those decisions are sealed inside, and the only report you get about them is a stain in the next room years later.
Frequently Asked Questions
With a flood test. The drain is plugged, the pan is filled to just below the top of the curb, the water line is marked, and it sits for 24 hours. If the mark drops or anything shows below, the pan is opened and corrected before a tile is set.
No. Green board is paper-faced gypsum with a treated core, and the paper facing is an organic material that can feed mold once it stays damp. It is fine for the rest of a bathroom, outside the wet area, where humidity rather than direct water is the concern.
Usually the opposite. A plastic vapor sheet behind the substrate plus a surface membrane in front of it creates what installers call a vapor sandwich: moisture caught between the two has no way out in either direction and stays there.
The assembly gets tighter and taller. Steam is vapor under pressure, so the ceiling has to be waterproofed too and sloped rather than flat, so condensate runs down the wall instead of dripping on you. The enclosure needs a full-height seal rather than an open top, and the vapor rating of the whole assembly becomes the governing spec.
It makes the joint itself non-porous, so it does not absorb, does not stain the way cement grout does, and never needs sealing. It does not waterproof the wall behind it. Epoxy also has a short working time and unforgiving cleanup, which makes it far less tolerant of a slow installer.
In a wet area, it is a bad idea. Tiling over it buries whatever waterproofing already failed instead of replacing it, and the added thickness raises the floor relative to the drain flange while shrinking curb height and door clearance. It also adds dead load to a wall never framed for it.
Request a bathroom remodel walkthrough — we will read what your shower is already telling us, explain which layer is likely missing, and put the rebuild in writing before anything comes out. Palacios Construction Group serves Willis, Conroe, and The Woodlands, from shower rebuilds in Cleveland to lake-home baths in Montgomery. Call (936) 828-8664.
