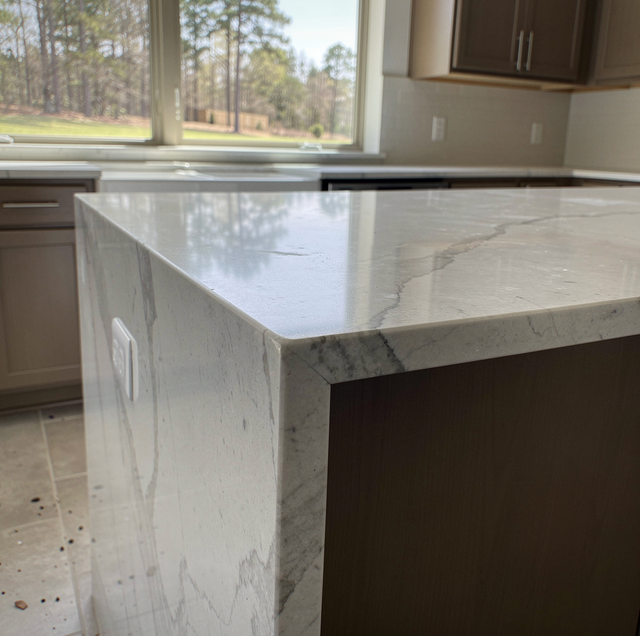
Stand at the end of your waterfall island, and your eye goes straight to the corner. The top runs out past your cabinet run, turns down, and falls to the floor as though the stone folded there. Whether that corner reads as a single unbroken run or as two slabs glued at an angle is not a fabrication question.
It was answered weeks earlier, at the slab yard and on your own template. By the time your fabricator marks the miter, the vein crossing your top and turning down your panel is either already yours or already gone. Knowing exactly what fills those weeks changes what you ask for, and you can still ask the question while your own answer costs you nothing but time.
A mitered waterfall is two pieces of stone that meet at an outside corner. Each piece is cut back at forty-five degrees along its underside, so the two cut faces close together and the polished surfaces carry around the corner with no exposed edge between them. Set against that, a butt joint leaves the full thickness of the vertical panel showing as a band under the top, which is a different look and a simpler one to make.
What the miter asks for in return is pattern. A joint that hides its own thickness stops hiding anything else, so a vein that dies at the corner or picks up an inch off-line becomes the thing you see from the doorway. The cut is ordinary shop work. Getting the two faces to come off the slab already lined up is the work that has to happen earlier.
What a Mitered Corner Asks of the Slab
Where the Seams Go, and Why
A countertop seam is a butt joint between two slab pieces, pulled tight with seam setters and bonded with a color-matched adhesive. It will always be findable by a fingernail and by raking light. The honest goal is not to erase it. The goal is to put it where nothing in the room invites you to look.
Seam placement follows a short list of physical rules before it follows taste. A seam wants to land where the stone is continuously supported beneath it, so it goes over a cabinet wall or a run of blocking, never over open air. It wants to avoid the weak spots a fabricator already has to reinforce, so it stays clear of the narrow rail in front of an undermount sink and the inside corners of a cooktop cutout. It wants a shorter run over a shorter span, because a long unbroken piece of stone has to survive a truck, a doorway, and a stair before it survives your kitchen. Then, and only then, taste gets its turn: of the placements left standing, you take the one your eye reaches last.
On a waterfall island, that list collapses onto a single choice, because the mitered corner is itself a joint and the panel below it is a second one. Put a horizontal seam in the top as well, and you now have three lines of adhesive on one small object. Most layouts handle that by running the top and the two legs out of the same slab in one sequence, which is why the island gets drawn on the slab before anything else does.
Vein Continuity Is Chosen at Slab Layout
Slab layout is the step where a shop lays the finished shapes over a photograph or digital scan of the actual slab and moves them until the pattern works. On a waterfall, the top and the leg are placed nose to nose across the miter line, so the vein that runs off the front edge of the top is the same vein that starts at the top of the leg.
Continuity is a geometry problem before it is a taste one. The two shapes have to sit adjacent on the slab in the right orientation, which uses more of it and leaves offcuts good for nothing. A shop working from a stock cut list will not land on it by accident, so the layout must be requested by name and approved before cutting.
Choosing the Slab With the Layout Already in Hand
Stone is natural, and no two slabs are identical. A sample chip, or a color name in a brochure, carries almost nothing about the movement in the piece that ends up in your kitchen. One name can cover slabs that look nothing alike, which is why standing in front of the actual stone stays part of the job.
What changes when you bring the layout is what you look for. Without it, you are choosing a slab you like. With it, you are checking whether a particular slab can support your island's top and both legs in the right places, with the vein traveling the way you want, and still have enough left for the rest of the run.
Sequenced slabs matter here too. Slabs cut from one block come off the saw in order, and two consecutive ones carry closely related patterns, which is how a book-matched backsplash or a two-slab island becomes possible. If your island needs two slabs, that ordering has to be reserved on the day you pick, because the sequence is not held for you.
The Miter Is Cut and Bonded in the Shop
The miter itself is shop work on a saw with a tilting head or on a bridge saw, followed by hand polishing of the two faces so they close without a shadow line. The two legs are then bonded, clamped, and cured on a flat table before the assembly ever leaves the building.
That location is a health matter, not a convenience. Cutting, grinding and polishing stone makes dust fine enough to reach deep lung tissue. Some engineered stone products contain up to 95 percent crystalline silica, which makes dust control critically important. Silicosis is a lung disease caused by inhaling excessive amounts of respirable crystalline silica, not reversible but preventable.
The miter is cut by a fabrication crew on shop saws fed with water or ventilation, because wet cutting and ventilation are the engineering controls that protect workers' lungs from silica dust.
What Survives the Trip From Slab to Finished Corner?
Between a slab yard and a finished corner sit two conversions, and each loses something. The first is the template, a record of the room as it actually is, out-of-square walls and all, which is why a template taken off finished cabinets beats one off a drawing. The second is the cut, where layout shapes become real pieces with real kerf widths.
What survives both conversions is whatever was written down. A vein alignment you talked about at the yard does not survive; a marked layout approved on paper does. So does a seam location noted on the template, a miter called out on the order, and a finished floor height recorded before the panel was dimensioned. Everything else gets remade at the saw by someone who was not standing in your kitchen.
Where the Waterfall Panel Meets the Floor
A waterfall leg is dimensioned to a finished floor, not to a subfloor. If the flooring changes after templating, from a thin plank to a thick tile on a mortar bed, the leg is now too long or too short, and stone does not take a trim on site the way a cabinet does.
So flooring selection belongs in the same week as the template instead of two weeks after. If the floor is not down yet, the crew works to a written finished height that someone owns. A leg that lands proud of the floor is visible from every seat.
When a Waterfall Is the Wrong Call
There are kitchens where this detail should be talked out of. An island that will move in a future layout, a figured stone whose pattern fights itself at a corner, or a household that wants seating on four sides and loses two knees to a leg.
The layout meeting where all of this gets worked out takes an afternoon. The corner it produces is the first thing anyone looks at in that kitchen for as long as the kitchen lasts, and no part of it can be re-cut later.
Frequently Asked Questions
Only by replacing the top. The miter is cut into the underside of the piece already on your island, so your existing top would have to come off, go back to the shop and be re-cut, and a leg from a different slab will not carry your pattern anyway. Ask for yours up front.
Look at the underside and at the corner. A mitered corner shows a hairline joint running at forty-five degrees when you look under your edge, and the polished face carries straight around the outside with no change of grain direction. A built-up edge is a strip of the same stone laminated under the top to fake thickness, and its joint runs horizontally, parallel to your counter. Run a fingernail along your outside corner: a miter gives you one arris, a laminated edge gives you two.
Engineered quartz is easier to hide a miter in, because its color runs consistently slab to slab and your joint disappears into an even field. Natural stone asks more of the layout, since the pattern has to be matched rather than assumed. Both chip at a thin arris if you swing a pot into one, so ask your fabricator for an eased arris on your island.
Six things: the marked slab layout with your island drawn on it, every seam location, your edge profile called out at each run, the miter noted where it applies, your sink cutout with radiused corners, and your finished floor height. If you need a second slab, the order should name that slab's exact sequence number too, so nobody substitutes a different piece from the same color.
Across your miter, yes, because the miter is cut from one piece. Across a seam in your top, only if the shop was given sequenced slabs and laid both pieces out as a pair. Ask where it falls before you approve your layout, since a seam near the middle of a long island is harder to ignore than one at a cooktop.
Your cabinet run has to be level and properly supported first, because a heavy slab set over an unlevel or poorly supported run produces stress cracks and failed seams later, and that prep work matters as much as the stone itself. On a waterfall island, there is a second requirement: the end cabinet has to be plumb and square, since the leg hangs off the top at a fixed angle and cannot be tipped to follow a leaning box. Shims go in before templating, not after, and your template is taken from cabinets fastened down. If you are opening a wall in the same project, get the framing done before anyone templates your island.
Bring the layout question to the walkthrough — Joel will look at your island, the stone you are drawn to, and tell you where the seam wants to land before a slab is reserved in your name. Palacios Construction Group serves Willis, Conroe, and The Woodlands. Call (936) 265-7256.
